


by Matthew Barsalou, guest blogger
I needed to find a way to perform experiments to practice using design of experiments (DOE) , so I built a simple do-it-yourself (DIY) catapult. The basic plan for the catapult is based on the table-top troll catapult from http://www.stormthecastle.com/catapult/how-to-build-a-catapult.htm .My catapult is not as attractive as the troll catapult; my goal was to build a catapult with multiple adjustable factors—and not to lay siege to a castle—so I don’t mind the rough appearance of my catapult.
The frame consists of two pieces of 40 cm x 4 cm x 2 cm wood, two pieces of 24 cm x 4 cm x 2 cm wood, and eight pieces of 20 cm x 4 cm x 2 cm wood. I could have used other dimensions. The shorter pieces are 50% the length of the long pieces; however, if you use other dimensions, be sure that the wood is thick enough to avoid breaking under the stress of a launch. The catapult arm is made of a 45 cm x 2 cm x 2 cm piece of wood. I could have used a thicker piece for the catapult arm, but wanted something light. Also needed are 16 wood screws. The four screws used to hold the supports to the base must be flathead so the catapult's wooden bottom can sit flat.
I used eighteen small screw eyes to add adjustability and four screw hooks to attach the rubber bands that power the catapult arm. The rubber bands are heavy rubber bands intended for model building, although regular rubber bands could work with a smaller catapult. I used 60 mm diameter, 100 mm diameter and 130 mm diameter rubber bands. The catapult cup can be an actual small cup; I used the bottom of a small plastic bottle.
For projectiles, I could have used small balls—but I wanted a projectile that would not roll or slide much after landing, so I used three small bags of rice as the projectiles. I also used a metal rod cut into pieces for the pivot point on the catapult arm and for the rubber band guides, arm stoppers and arm starting points.
The dimensions can be modified as needed. For example, two pieces of 1” x 2” x 15.75” wood, two pieces of 1” x 2” x 9.5” wood, eight pieces of 1” x 2” x 8” and one piece of 1” x 2” x 18” wood could be used to build the catapult using standard sizes. The catapult can also be scaled-up or scaled-down; just be sure it is wide enough so that it will not tip over.
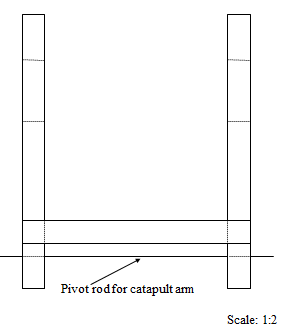
Here is the right-side view of the catapult, without the catapult arm:
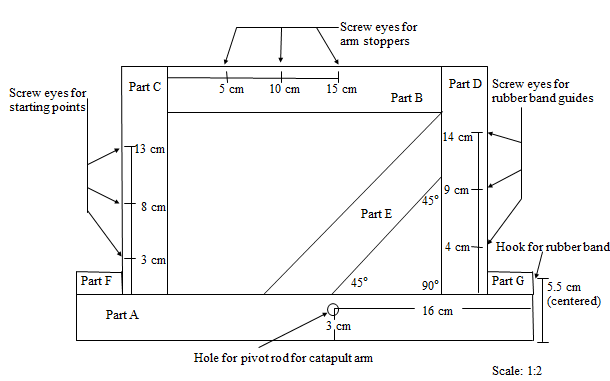
This is the view from the front, again without the catapult arm:
This is the right-side view of the catapult arm:

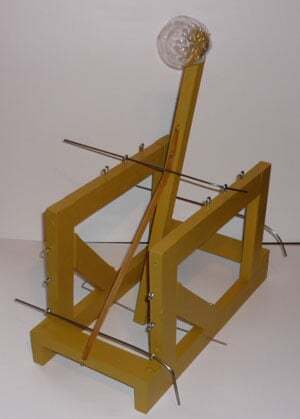
And this is what the completed catapult looks like:
Now that my catapult is built, I have one last step to complete: to find the optimal catapult setting using DOE, which I'll do with Minitab Statistical Software in my next post.
If you want to build your own, here are my plans and instructions for the DIY DOE Catapult in a PDF document.