Ughhh... your process is producing some parts that don't meet your customer's specifications! Fortunately, after a little hard work, you find a way to improve the process.
However, you want to perform the appropriate statistical analysis to back up your findings and make it easier to explain the process improvements to your boss. And it's important to remember that your boss is much like the boss in Eston's posts -- he's not too familiar with statistics, so you'll have to take it slow and show lots of "visual aids" in your explanation. How should you begin?
Enter before-and-after process capability analysis.
A process capability analysis evaluates how well a process meets a set of requirements defined by specification limits.
For example, a manufacturer of photocopiers requires that the width of a rubber roller must be between 32.523 cm and 32.527 cm to avoid paper jams. Capability analysis reveals how well the manufacturing process meets these specifications, and provides insight into how to improve the process.
Performing Before and After Process Capability Analysis
Assessing process capability before and after making process changes can be a valuable and easy way to prove improvements were made, while also ensuring your process is still meeting specification limits and producing “good” parts.
But before assessing processing capability, you must first ensure your process is stable—you can’t predict the performance of an unstable process! But you can predict, and improve on, a stable process.
Let’s go through a quick example to illustrate how one group of engineers used Minitab, as well as the Assistant, to create control charts and perform process capability analysis to assess a process and prove they made process improvements.
Using Process Capability to Assess a Process
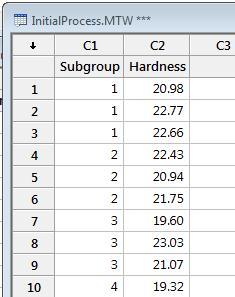
An extruded parts maker needed to verify their process was running between the lower spec limit of 17.5 hardness units and the upper limit of 22.5 hardness units, with the target value of 20. To collect data for their analysis, operators randomly selected three extruded parts at regular intervals, and recorded the hardness of each part:

(Download the data here if you want some practice.)
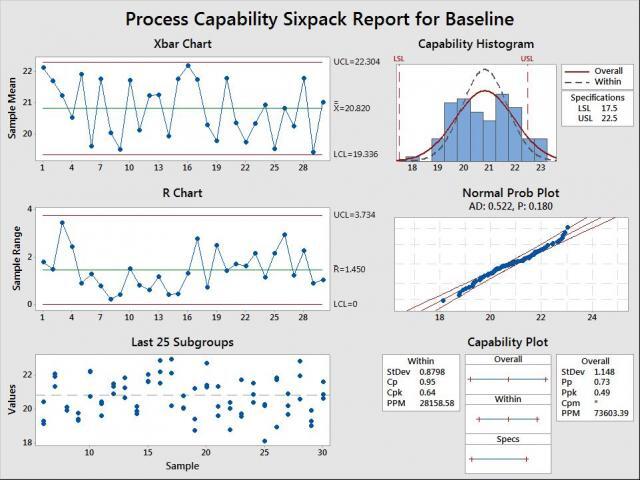
Engineers then used process capability analysis (in Minitab, go to Stat > Quality Tools > Capability Sixpack > Normal) to evaluate the capability of the manufacturing process in meeting the aforementioned customer requirements.
 The control charts revealed a stable process, with all points falling within the control limits. However, the histogram showed that many measurements fell outside the specification limits, with 73,603 parts per million defective overall. With more parts falling above the upper spec limit than below the lower limit, the engineers concluded that the process mean must be shifted. Also, the histogram shows that variation needed to be reduced in order to reduce the number of defective parts and improve the capability of the process.
Using Process Capability to Verify Improvements
The engineers adjusted the process to reduce the variation and obtain a process mean closer to 20. So once again, operators collected 30 parts using the same sampling method, and measured the hardness of the parts.
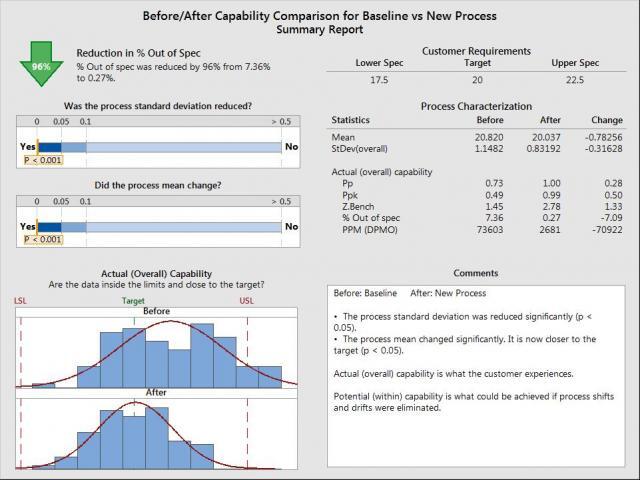
The engineers then ran a before-and-after capability analysis using the Assistant to see how their improvements successfully shifted the process mean and reduced variation. Below, you can see that the Assistant provided the engineers with the interpretation of their output, which also doubled as an easy-to-understand "visual aid" to share with their boss:

The engineers were happy to see their adjustment to the process reduced the PPM from 73,603 to 2,681—a 96% reduction in percent out of spec—and the process mean shifted from 20.820 to 20.037, along with reduced variation. Best of all, the engineers had statistical proof and graphs to easily explain the process improvements to their boss!
For more on process capability analysis, check out:


