


Design of experiments (DOEs) is a very effective and powerful statistical tool that can help you understand and improve your processes, and design better products.
DOE lets you assess the main effects of a process as well as the interaction effects (the effect of factor A, for example, may be much larger when factor B is set at a specific level, leading to an interaction). In science and in business, we need to perform experiments to identify the factors that have a significant effect. The objective of DOE is to reduce experimental costs—the number of tests—as much as possible while studying as many factors as possible to identify the important ones.
Fractionating a Design
Suppose you need to study the effects of 6 two-level factors on a response. A full factorial design would require no less than 64 runs. In practice, having six predictive variables is very common, but running 64 tests is very costly and hard to justify. That is why fractional factorial designs are often used to reduce the number of runs in two-level DOEs. Fractional factorial designs are very popular, and doing a half fraction, a quarter fraction, or an eighth fraction of a full factorial design can greatly reduce costs and time needed for an experiment.
To study 6 factors, you could use a 32-run design (a half fraction of the full design), a 16-run design (quarter fraction), or even an 8-run design (eighth fraction). In Minitab, you can quickly access the table of factorial designs shown below by selecting Stat > DOE > Factorial > Create Factorial Design... and clicking "Display Available Designs."
Notice that the 8-run design to study the effects of 6 two-level factors is colored red. This is because we pay a price for reducing the number of runs from 64 to 8: aliases (confounded effects) have been generated, so interpreting the results becomes more difficult and riskier. In the table, red means that some factors are confounded with two-factor interactions:
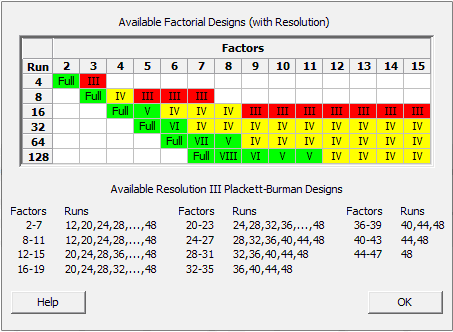
Resolution III Design
In an 8-run design with six factors, for example, the A factor is confounded with the BD interaction. We call this a resolution III design since A = BD, which means we have three elements in this alias chain. An experimenter cannot separate their confounded effects: if the effect of A or BD is significant, you cannot be absolutely sure whether this is due to the A factor or to the BD interaction.
Which Effects and Interactions Are Confounded?
When you create a fractional factorial design, Minitab tells you which main effects and interactions are confounded with an alias structure and the “alias chains” like these:
Design Generators: D = AB, E = AC, F = BC
Alias Structure
I + ABD + ACE + BCF + DEF + ABEF + ACDF + BCDE
A + BD + CE + BEF + CDF + ABCF + ADEF + ABCDE
B + AD + CF + AEF + CDE + ABCE + BDEF + ABCDF
C + AE + BF + ADF + BDE + ABCD + CDEF + ABCEF
D + AB + EF + ACF + BCE + ACDE + BCDF + ABDEF
E + AC + DF + ABF + BCD + ABDE + BCEF + ACDEF
F + BC + DE + ABE + ACD + ABDF + ACEF + BCDEF
AF + BE + CD + ABC + ADE + BDF + CEF + ABCDEF
The three- and four-factor (higher order) interactions are rarely considered. Why? A three-factor interaction, for example, would mean that the effect of a factor is modified by the setting of another factor, and that the effect of this two-factor interaction would be modified by the setting of a third factor. This is an unlikely and complex event, so we aren't so worried about these higher-order interactions in a fractional design.
Choosing an Appropriate Fractional Design
Sometimes the price we pay for a reduction in the number of tests is too high. That's the case for resolution III designs shown in red above.
In the Pareto graph of effects, the A factor seems to be significant (above the significance threshold), but A is also confounded with the CE interaction (for example). Only A is displayed in the Pareto chart, but it is just the first term of a long alias chain:
A + BD + CE + BEF + CDF + ABCF + ADEF + ABCDE
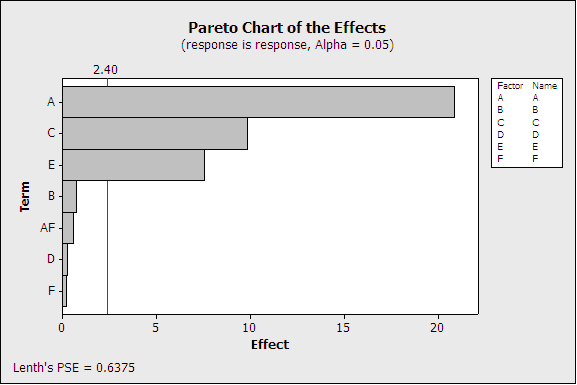
Since you cannot separate the effects of A and the other elements of the alias chain, interpreting the true signifiance of that chart is very difficult.
Resolution IV Design
The yellow designs in the Available Factorial Designs table are much less risky. These designs confound two-factor interactions with other two-factor interactions. For example, in a 16-run, 6 two-level factor design, the AB interaction is confounded with the CE interaction. This a resolution IV design, because we have four elements in the alias chain AB=CE. Again, you cannot separate the effects of AB and CE.
Alias Structure
I + ABCE + ADEF + BCDF
A + BCE + DEF + ABCDF
B + ACE + CDF + ABDEF
C + ABE + BDF + ACDEF
D + AEF + BCF + ABCDE
E + ABC + ADF + BCDEF
F + ADE + BCD + ABCEF
AB + CE + ACDF + BDEF
AC + BE + ABDF + CDEF
AD + EF + ABCF + BCDE"
AE + BC + DF + ABCDEF
AF + DE + ABCD + BCEF
BD + CF + ABEF + ACDE
BF + CD + ABDE + ACEF
ABD + ACF + BEF + CDE
ABF + ACD + BDE + CEF
Though obviously already less risky than the red resolution III designs, this resolution IV (yellow) design is not even as risky as it might appear for two reasons:
- Effect “Sparsity": Usually, only a few of the many factors investigated will eventually turn out to be important (the “Pareto rule”).
- The “heredity” (or “hierarchy”) principle: When two interactions are confounded with one another, the interaction that is the most likely to be significant is the one containing factors whose main effects are themselves significant.
As a consequence of this, out of the many factors that are investigated, we expect only a few to be statistically significant and we can focus on the interactions containing factors whose main effects are themselves significant. At this stage, we will also have a better understanding of our process from a physical point of view. Knowing which factors have a real effect will help us determine which interactions are more likely.
In a resolution IV design, two-factor interactions are not confounded with any main effect, so this design is a lot safer than a resolution III design, and it lets you study up to 8 factors in only 16 runs—quite a cost-effective solution!
Folding a Design
Suppose that, despite all this, AB and CE are confounded and we are still not really sure which interaction is significant. We really want to separate the effects of the AB and the CE interactions, and we think that AB is just as likely to be significant as CE. Perhaps all or none of the A, B, C and E main effects are significant, in which case the “heredity” principle won't be helpful.
As a solution of last resort, we could run additional tests to separate the confounded interactions. In Minitab, we'd go to Stat > DOE > Modify Design :
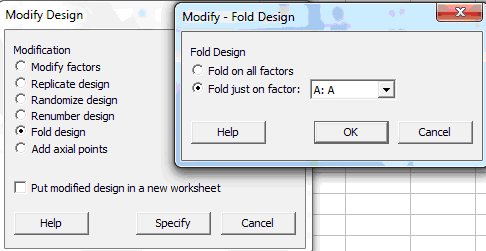
This will augment our initial DOE design by adding follow-up tests (a “folded” design). If our initial design had 16 runs, 16 folded runs will need to be added to obtain a design in which the AB and the CE interactions can be analyzed separately. Folding means that the additional series of tests will be similar to the initial DOE. The follow-up section is a mirror image of the initial series of tests except that the level of a factor (or of all factors) will be systematically changed in the subsequent “folded” tests.
By “fractionating” a design we reduce the number of tests. By “folding” a fraction we double its size to separate confounded interactions / main effects.
If you need to separate the AB from the CE interaction, you can fold on factor A (or alternatively on factor B or on C or on E) in order to break the “alias chain.” Folding on all factors can separate all main effects from the two-factor interactions when a resolution III design (shown in the red zone of the Available Factorial Designs table) has been performed.
You can even reduce the number of additional follow-up tests in order not to double the number of tests by folding the initial design, but that requires more advanced techniques.
A Safe Strategy for Efficient DOE
No design of experiments is totally, 100% risk free, but I hope you're convinced that fractionating and reducing the size of your design is a sensible and cost-effective strategy. In practice, the initial fraction is almost always sufficient by itself—but if the results turn out to be ambiguous, as a solution of last resort you can still modify the initial fraction and add a “folded fraction.”