Last time, we set up a worksheet for doing a Gage Linearity and Bias Study in Minitab Statistical Software. This time, we’ll take a look at my sample data and see what we might learn from a Gage Linearity and Bias Study. Getting comfortable with the variation present in measurement systems will go a long way towards building your confidence with quality statistics. Remember too that the experience of collecting data will help you to understand some of the issues that arise when you want to do process improvement projects.
If you got started early, and followed my measurement process, let me take a minute to apologize. I usually have teams do this exercise with yardsticks, and I had no idea it would take almost 2 hours to collect the 72 observations with a 6-inch protractor. We’ll talk about how that affected my data in my next blog post. For now, we’ll stick to the formal part of the measurement systems analysis study.
Here’s my data:
|
RunOrder |
Parts |
Operators |
inches |
sixteenths |
total |
|
1 |
48 |
Cody |
47 |
8 |
47.5 |
|
2 |
40 |
Cody |
39 |
6 |
39.375 |
|
3 |
32 |
Cody |
31 |
13 |
31.8125 |
|
4 |
8 |
Cody |
8 |
1 |
8.0625 |
|
5 |
16 |
Cody |
15 |
7 |
15.4375 |
|
6 |
24 |
Cody |
24 |
0 |
24 |
|
7 |
8 |
Cody |
7 |
14 |
7.875 |
|
8 |
24 |
Cody |
23 |
13 |
23.8125 |
|
9 |
40 |
Cody |
39 |
5 |
39.3125 |
|
10 |
48 |
Cody |
47 |
10 |
47.625 |
|
11 |
16 |
Cody |
16 |
6 |
16.375 |
|
12 |
32 |
Cody |
32 |
0 |
32 |
|
13 |
16 |
Cody |
15 |
15 |
15.9375 |
|
14 |
40 |
Cody |
39 |
10 |
39.625 |
|
15 |
32 |
Cody |
31 |
12 |
31.75 |
|
16 |
48 |
Cody |
47 |
15 |
47.9375 |
|
17 |
8 |
Cody |
7 |
14 |
7.875 |
|
18 |
24 |
Cody |
24 |
0 |
24 |
|
19 |
40 |
Cody |
40 |
0 |
40 |
|
20 |
16 |
Cody |
16 |
1 |
16.0625 |
|
21 |
8 |
Cody |
7 |
15 |
7.9375 |
|
22 |
24 |
Cody |
23 |
15 |
23.9375 |
|
23 |
48 |
Cody |
47 |
12 |
47.75 |
|
24 |
32 |
Cody |
31 |
15 |
31.9375 |
|
25 |
24 |
Cody |
24 |
0 |
24 |
|
26 |
32 |
Cody |
322 |
0 |
322 |
|
27 |
8 |
Cody |
7 |
15 |
7.9375 |
|
28 |
48 |
Cody |
47 |
13 |
47.8125 |
|
29 |
16 |
Cody |
15 |
15 |
15.9375 |
|
30 |
40 |
Cody |
39 |
15 |
39.9375 |
|
31 |
16 |
Cody |
16 |
0 |
16 |
|
32 |
32 |
Cody |
31 |
15 |
31.9375 |
|
33 |
8 |
Cody |
7 |
15 |
7.9375 |
|
34 |
24 |
Cody |
24 |
0 |
24 |
|
35 |
48 |
Cody |
48 |
0 |
48 |
|
36 |
40 |
Cody |
39 |
14 |
39.875 |
|
37 |
32 |
Cody |
32 |
2 |
32.125 |
|
38 |
48 |
Cody |
48 |
0 |
48 |
|
39 |
40 |
Cody |
39 |
15 |
39.9375 |
|
40 |
8 |
Cody |
8 |
0 |
8 |
|
41 |
24 |
Cody |
23 |
15 |
23.9375 |
|
42 |
16 |
Cody |
16 |
0 |
16 |
|
43 |
16 |
Cody |
16 |
0 |
16 |
|
44 |
32 |
Cody |
32 |
0 |
32 |
|
45 |
40 |
Cody |
40 |
0 |
40 |
|
46 |
48 |
Cody |
47 |
15 |
47.9375 |
|
47 |
8 |
Cody |
8 |
0 |
8 |
|
48 |
24 |
Cody |
24 |
0 |
24 |
|
49 |
32 |
Cody |
32 |
0 |
32 |
|
50 |
16 |
Cody |
15 |
15 |
15.9375 |
|
51 |
8 |
Cody |
7 |
15 |
7.9375 |
|
52 |
40 |
Cody |
39 |
15 |
39.9375 |
|
53 |
48 |
Cody |
47 |
12 |
47.75 |
|
54 |
24 |
Cody |
23 |
15 |
23.9375 |
|
55 |
24 |
Cody |
24 |
0 |
24 |
|
56 |
48 |
Cody |
47 |
15 |
47.9375 |
|
57 |
40 |
Cody |
40 |
1 |
40.0625 |
|
58 |
8 |
Cody |
8 |
0 |
8 |
|
59 |
16 |
Cody |
15 |
15 |
15.9375 |
|
60 |
32 |
Cody |
32 |
0 |
32 |
|
61 |
16 |
Cody |
16 |
0 |
16 |
|
62 |
48 |
Cody |
47 |
12 |
47.75 |
|
63 |
40 |
Cody |
39 |
14 |
39.875 |
|
64 |
32 |
Cody |
31 |
15 |
31.9375 |
|
65 |
8 |
Cody |
8 |
1 |
8.0625 |
|
66 |
24 |
Cody |
23 |
14 |
23.875 |
|
67 |
8 |
Cody |
7 |
15 |
7.9375 |
|
68 |
48 |
Cody |
47 |
13 |
47.8125 |
|
69 |
40 |
Cody |
39 |
15 |
39.9375 |
|
70 |
16 |
Cody |
15 |
15 |
15.9375 |
|
71 |
32 |
Cody |
31 |
10 |
31.625 |
|
72 |
24 |
Cody |
24 |
0 |
24 |
As a note for data entry, I found it a lot easier to enter the whole number of sixteenths, then use the Minitab calculator to get the actual measurement. To accurately enter a sixteenth would require entering as many as four digits instead of two and would mean that you would have to remember or calculate the decimal representation of 13/16. Entering two digits and letting Minitab do the work for you is faster if you have to enter data by hand. Feel free to try it out. I wrote it into the calculator as:
'inches' + 'sixteenths' / 16
To get the results for the gage linearity and bias study, follow these steps:
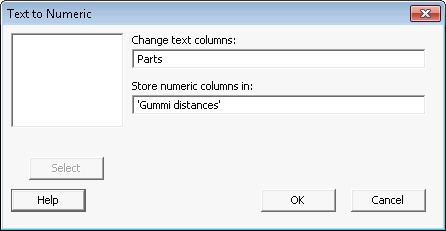
- Choose Data > Change Data Type > Text to Numeric.
- Enter the Parts column that you created from the post before in Change text columns.
- Enter a new column name to store the reference distances as numbers: I’m using ‘Gummi distances’. Click OK.
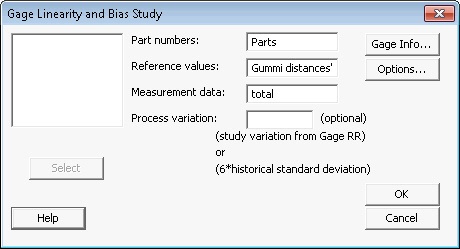
- Choose Stat > Quality Tools > Gage Study > Gage Linearity and Bias Study.
- In Parts, enter the text column from when you created the Gage R&R worksheet.
- In Reference values enter the numeric column you named in step 3.
- In Measurement data, enter the column with the measurements that you recorded. Click OK.

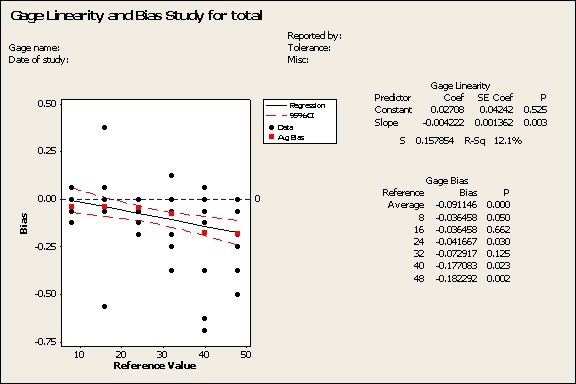
The results are what you would expect given our measurement process. The Gage Bias table shows that the more times you have to move the protractor, the further off the measurements become The slope in the Gage Linearity table gives you a way to judge how quickly the measurement error increases with distance. In this case, 4 thousandths of an inch per inch may not sound like a lot, but in a real process, it will be critical to judge when that error will start to have real, practical consequences.

Another neat result for building your confidence in understanding quality statistics is what happens with the p-values in the Gage Bias table. While the average bias turns out to be the same for 8 inches and 16 inches, the Gage Bias table has a large p-value for 16 inches and a small p-value for 8 inches. You can see the difference in the chart. The points at 16 inches are spread out much more than the points at 8 inches. The p-value, which assesses the statistical significance of the size of the bias, depends on how spread out the points are for a given reference measurement.
The point of the gage linearity and bias study is to detect whether your measurements are harder to take as they get bigger or smaller. While we usually want to study how far off we are on average, keep in mind the consistency of the measurements, too. We’ll get to study consistency more formally soon, with a Gage R&R study.


